Monopoint lighting, a technique utilizing a single light source, is a powerful tool for creating dramatic and impactful artistic displays. Are you struggling to capture the essence of your artwork or enhance the visual appeal of your products? Do you find yourself overwhelmed by complex lighting setups? Monopoint lighting offers a surprisingly versatile and accessible solution, allowing you to achieve professional-looking outcomes with minimal equipment. This thorough guide will explore the art of monopoint lighting, detailing its principles, practical applications, and creative potential. We’ll walk you through the key considerations for effective monopoint lighting and offer actionable advice to help you transform your displays. Get ready to unlock the transformative power of monopoint lighting!
Understanding Monopoint Lighting Basics
Defining Monopoint Lighting
Monopoint lighting, in its simplest form, involves using only one light source to illuminate your subject. This single point of illumination can be a spotlight, a desk lamp, or even a strategically placed window. The beauty of monopoint lighting lies in its ability to create highly focused and dramatic effects. It forces you to think strategically about light direction, intensity, and shadow play, all contributing to a distinctive visual aesthetic.
The Power of Simplicity
Many artists and photographers are intimidated by complex lighting setups, often feeling they need an arsenal of strobes, softboxes, and modifiers to achieve professional outcomes. Monopoint lighting challenges this misideaion by demonstrating that a single, well-placed light source can be incredibly effective. This simplicity makes monopoint lighting highly accessible to beginners, while still offering a wealth of creative possibilities for experienced professionals.
determineing Your Subject
Before you even think about lighting, determine your subject. What are you trying to highlight? The shape, texture, and color of your subject all play a crucial function in determining the optimal approach to monopoint lighting. Understanding your subject intimately is the first step towards effective lighting.
Mastering Light Direction and Intensity
The Impact of Angle
The angle at which your single light source strikes your subject profoundly affects the overall look and feel of the outcomeing image. A light positioned directly overhead can create harsh shadows and a flat, uninteresting image. In contrast, a light angled from the side can generate dynamic shadows and highlight texture, adding depth and dimension to your subject.
Experimenting with Intensity
The intensity of your light source is another critical element to control. A bright light will create strong highlights and deep shadows, while a softer light will produce a more subtle and diffused effect. Experimenting with varied intensity levels is essential to discover the optimal balance for your particular subject and artistic vision. Consider using diffusers or reflectors to modify the intensity of your light.
Highlighting Key attributes
By carefully controlling both the angle and intensity of your monopoint light source, you can strategically highlight specific attributes of your subject. For instance, in product photography, you might use a monopoint light to accentuate the curves of a vase or the gleam of polished metal. In portraiture, you might use it to highlight the texture of a person’s skin or the sparkle in their eyes.
Creative Applications of Monopoint Lighting
Monopoint Lighting in Photography
Monopoint lighting is particularly effective in creating dramatic portraits, product shots, and still life arscopements. It allows you to sculpt your subject with light and shadow, drawing the viewer’s eye to key elements. Think of the classic chiaroscuro style of painting, which utilizes strong contrasts between light and shadow to create depth and drama. This same principle can be effectively applied using monopoint lighting in photography.
Artistic Displays and Installations
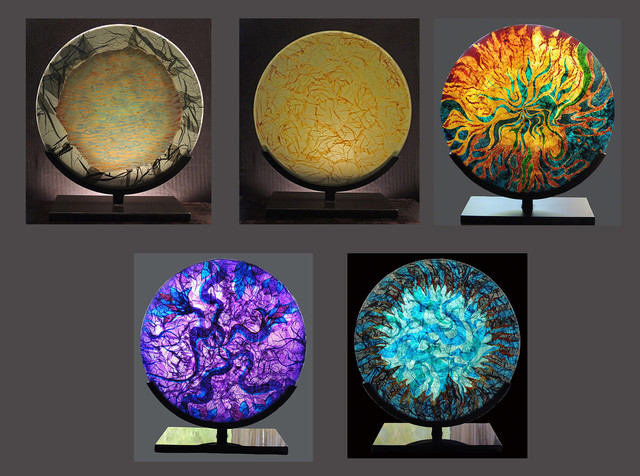
Monopoint lighting isn’t just for photography. It can also be used to create impactful artistic installations, illuminating sculptures, paintings, or other three-dimensional artworks in a dramatic fashion. By strategically positioning a single light source, you can transform the mood and ambiance of an entire space, drawing attention to specific elements while creating an atmosphere of intrigue and mystery.
Product Showcase and Presentation
Monopoint lighting can effectively highlight individual products in a retail or trade show setting. The focused light attracts the eye to a particular item, emphasizing its attributes and creating a sense of importance and value. This is especially useful for items with interesting textures, shapes, or designs that need to stand out from their surroundings. Consider the use of varied colored gels to enhance the mood further.
Choosing the Right Light Source
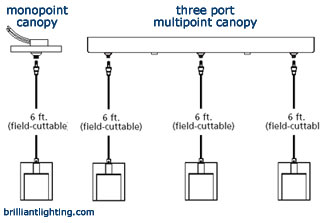
Types of Monopoint Lights
The choice of light source depends on several factors including your budget, the size of your subject, and the desired effect. Common monopoint lights include spotlights, desk lamps, LED panels, and even flashlights. Consider the color temperature of the light source. A warmer light (around 3000K) creates a cozy, intimate feel, while a cooler light (around 5000K) can feel crisp and modern.
Modifying Your Light Source
Modifying your light source can vastly alter the outcomeing image. Diffusers soften the light, reducing harsh shadows and creating a more ethereal look. Reflectors bounce the light onto your subject, adding fill light and reducing shadows. Experiment with varied modifiers to find the optimal balance for your needs. Colored gels can change the light’s color temperature, adding creative flair to your monopoint setups.
Experimentation is Key
The optimal way to learn monopoint lighting is to experiment. Start with a single light source and try varied positions, angles, and intensity levels. Observe how the light interacts with your subject and adjust accordingly. Don’t be afraid to make mistakes – they are valuable learning opportunities!
Advanced Monopoint Techniques
Using Backgrounds and Textures
The background behind your subject can play a significant function in your monopoint lighting setup. A simple, uncluttered background lets the subject stand out, while a textured background can create interesting interactions with the light. Carefully consider how your chosen background affects the lighting of your subject and whether it complements or detracts from the overall artistic effect.
Combining Monopoint with Ambient Light
While monopoint emphasizes a single dominant light source, you can also incorporate ambient light to add subtle fill light or create a more nuanced effect. This is particularly effective in low-light situations or when you want to add a sense of depth to the scene. Pay careful attention to the balance between your main monopoint light source and any ambient light present.
Creative Shadow Play
Monopoint lighting often produces strong shadows, which should be viewed as a tool rather than a limitation. By creatively manipulating the shadows, you can add drama, intrigue, and depth to your subject. Consider using props or barriers to shape or manipulate the shadows, transforming them from a potentially negative element into an integral part of your composition.
Mastering monopoint lighting techniques opens up a world of creative possibilities for artistic displays. By understanding the principles of light direction, intensity, and color temperature, you can dramatically enhance the impact of your artwork, photographs, or even product displays. Remember, the key is experimentation! Don’t be afraid to try varied approaches and observe how the light interacts with your subject. Continue learning, exploring diverse lighting setups, and refining your monopoint skills to elevate your artistic vision. Start experimenting today and watch your artistic displays transform!